Hi,大家好! 前陣子在專案上使用了 NextAuth 實作第三方登入,發現 NextAuth 整合了相當多的第三方登入!這篇文章除了會帶著大家認識如何實作,也會介紹在 Line, Facebook, Google 的環境設定。
# 什麼是 NextAuth?
以下為 NextAuth 官方文件 上對自己的介紹:
NextAuth.js is a complete open source authentication solution for Next.js applications.
簡單來說,NextAuth 讓我們可以輕鬆地搭配 Next.js 實作第三方登入。想了解更多的話,推薦看 NextAuth 的 官方文件。
# LINE 的環境設定
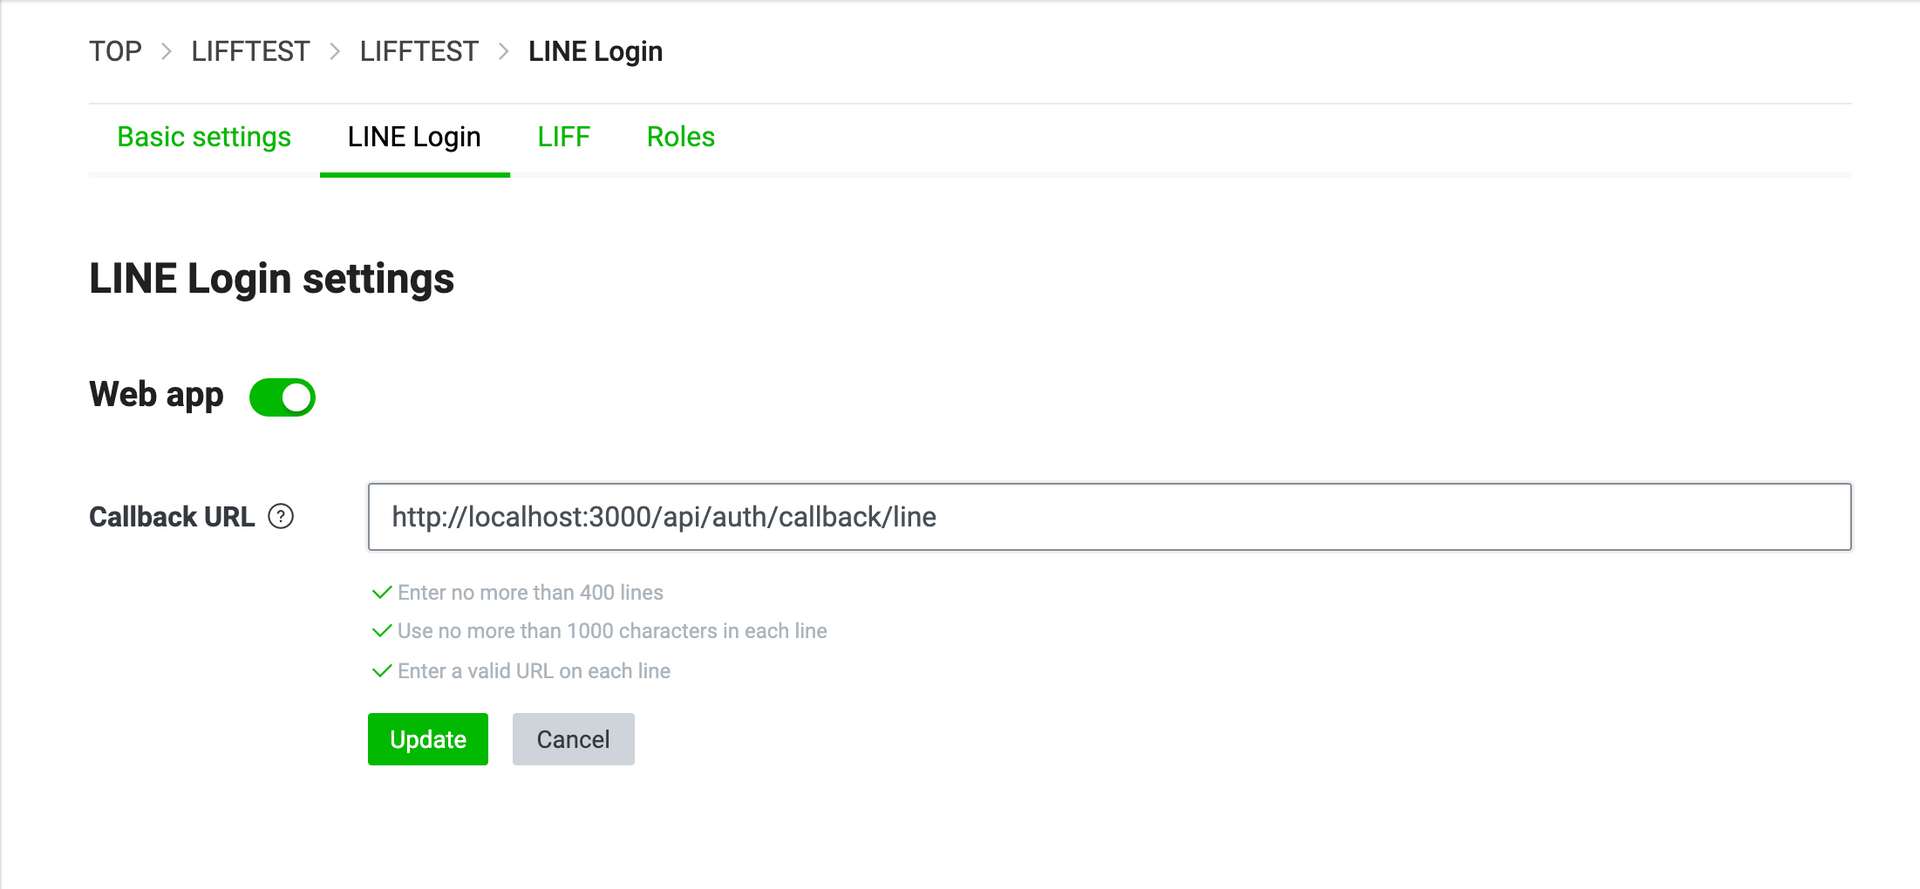
進入 Line developer console,接著新增一個 provider。在新的 provider 中新增 LINE login 的 channel。在剛剛新增好的 login channel,我們可以拿到 Channel ID 以及 Channel secret,這兩個號碼可以先記著,待會會用到。
接著在 LINE Login settings 中,設定 Callback URL = http://localhost:{port}/api/auth/callback/line。這邊視相對應的 port 填入。

# Google 的環境設定
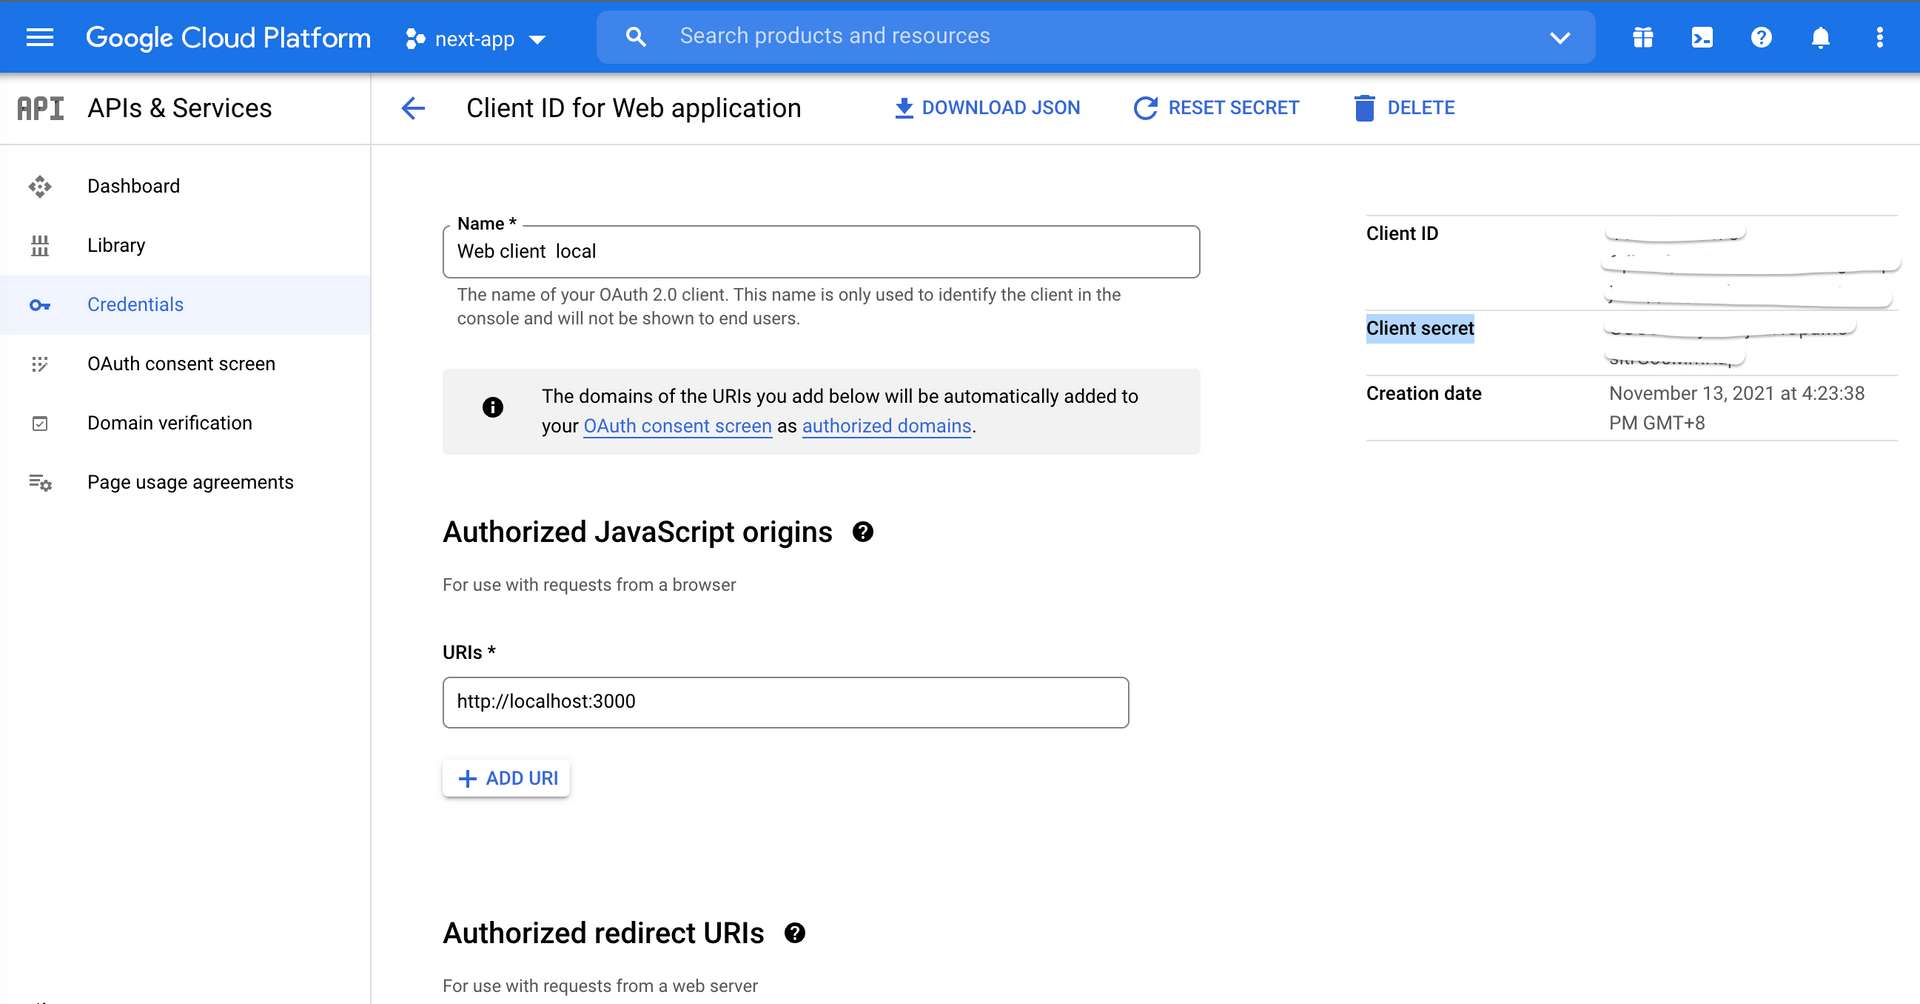
進入 Google cloud console,新增一個專案。在新的專案中進入 api & services 的 Credentials,新增一個 OAuth client ID,設定 Authorized JavaScript origins URIs = http://localhost:{port}; Authorized redirect URIs = http://localhost:{port}/api/auth/callback/google,新增成功後也記著這邊拿到的 Client ID 以及 Client secret。

# Facebook 的環境設定
進入 Facebook developer,新增一個 app,在 basic setting 的 domain 新增 http://localhost:{port}。接著在右上角按下 create test app ,這是剛剛新增的 app 的測試版。
-1920w.jpg)
接著我們使用測試版的環境,進入測試版後在 facebook login settings 的 Valid OAuth Redirect URIs 設定 https://{domain}/api/auth/callback/facebook。
這邊特別值得注意的是,如果你在 Valid OAuth Redirect URIs 想新增 http://localhost:{port}/api/auth/signin/facebook 會得到下方資訊:
http://localhost redirects are automatically allowed while in development mode only and do not need to be added here.
簡單來說,在 development mode 下不需要在這新增 redirect url。
-1920w.jpg)
接著回到 basic setting 中把測試版的 App ID 以及 App Secret 記下來。
設定完以上環境後,可以開始進入實作啦!
# 實作第三方登入
建立一個 NextJS 專案後,先安裝 next-auth
$yarn add next-auth接著把剛剛拿到的 Client ID 以及 Client secret 寫入環境變數。
這邊可以看到環境變數中還有一個 SECRET,這個環境變數主要會被用來像是 hash tokens。
我們可以使用官方文件推薦的方法,使用 openssl 產生。
SECRET='xxxxxx'

FACEBOOK_ID='xxxxxx'
FACEBOOK_SECRET='xxxxxx'

GOOGLE_ID='xxxxxx'
GOOGLE_SECRET='xxxxxx'

LINE_CHANNEL_ID='xxxxxx'
LINE_CHANNEL_SECRET='xxxxxx'
接著在 pages/api/auth 建立一個 [...nextauth].ts 檔。
因為 signIn, callback, signOut 等 request 都會在 /api/auth/* 被 NextAuth.js 處理。
此外,在 callbacks 中我們可以彈性的拿到一些資料。
import NextAuth from "next-auth";
import type { NextApiRequest, NextApiResponse } from "next";
import FacebookProvider from "next-auth/providers/facebook";
import GoogleProvider from "next-auth/providers/google";
import LineProvider from "next-auth/providers/line";

export default async function auth(req: NextApiRequest, res: NextApiResponse) {
  const providers = [
    FacebookProvider({
      clientId: process.env.FACEBOOK_ID,
      clientSecret: process.env.FACEBOOK_SECRET,
    }),
    GoogleProvider({
      clientId: process.env.GOOGLE_ID,
      clientSecret: process.env.GOOGLE_SECRET,
    }),
    LineProvider({
      clientId: process.env.LINE_CHANNEL_ID,
      clientSecret: process.env.LINE_CHANNEL_SECRET,
    }),
  ];

  return await NextAuth(req, res, {
    providers,
    secret: process.env.SECRET,
    jwt: {
      secret: process.env.SECRET,
    },
    session: {
      // This is the default. The session is saved in a cookie and never persisted anywhere.
      strategy: "jwt",
    },
    // Enable debug messages in the console if you are having problems
    debug: true,

    pages: {
      signIn: "/auth/signin",
      error: "/auth/signin",
      newUser: "/auth/new-user",
    },

    callbacks: {
      async session({ session, token }) {
        // Send properties to the client, like an access_token from a provider.
        session.accessToken = token.accessToken;
        session.refreshToken = token.refreshToken;
        session.idToken = token.idToken;
        session.provider = token.provider;
        session.id = token.id;
        return session;
      },
      async jwt({ token, user, account }) {
        // Persist the OAuth access_token to the token right after signin
        if (account) {
          token.accessToken = account.access_token;
          token.refreshToken = account.refresh_token;
          token.idToken = account.id_token;
          token.provider = account.provider;
        }
        if (user) {
          token.id = user.id.toString();
        }
        return token;
      },
    },
  });
}
接著在 types 建立一個 next-auth.d.ts 檔。
import NextAuth from 'next-auth';
import { JWT } from 'next-auth/jwt';
import { Session } from 'next-auth';
import Providers from 'next-auth/providers';

declare module 'next-auth' {
  /**
   * Returned by `useSession`, `getSession` and received as a prop on the `SessionProvider` React Context
   */
  interface Profile {
    email_verified: boolean;
  }
  interface Session {
    user: {
      /** The user's postal address. */
      id: number;
      email: string;
      name: string;
      image: string;
    };
  }
}

declare module 'next-auth/jwt' {
  /** Returned by the `jwt` callback and `getToken`, when using JWT sessions */
  interface JWT {
    /** OpenID ID Token */
    idToken?: string;
    accessToken?: string;
    providerId?: string;
  }
}

declare module 'next-auth/providers' {
  interface providers {
    provider: provider[];
  }
  interface provider {
    id?: string;
    name?: string;
  }
}
下一步,在 _app.tsx 加上 SessionProvider。
import { SessionProvider } from 'next-auth/react';
import { ChakraProvider } from '@chakra-ui/react';
import theme from '../chakra/theme';
import type { AppProps } from 'next/app';

function MyApp({ Component, pageProps: { session, ...pageProps } }: AppProps) {
  return (
    <SessionProvider session={session}>
      <ChakraProvider resetCSS theme={theme}>
        <Component {...pageProps} />
      </ChakraProvider>
    </SessionProvider>
  );
}

export default MyApp;
最後一步,在 header component 中設定拿到 session 跟沒有拿到 session 的狀態。
import { useSession, signIn, signOut } from 'next-auth/react';
import React from 'react';

export const Header = () => {
  const { data: session, status } = useSession();
  if (session) {
    return (
      <>
        Signed in as {session.user.email} <br />
        <button onClick={() => signOut()}>Sign out</button>
      </>
    )
  }
  return (
    <>
      Not signed in <br />
      <button onClick={() => signIn()}>Sign in</button>
    </>
  )
}
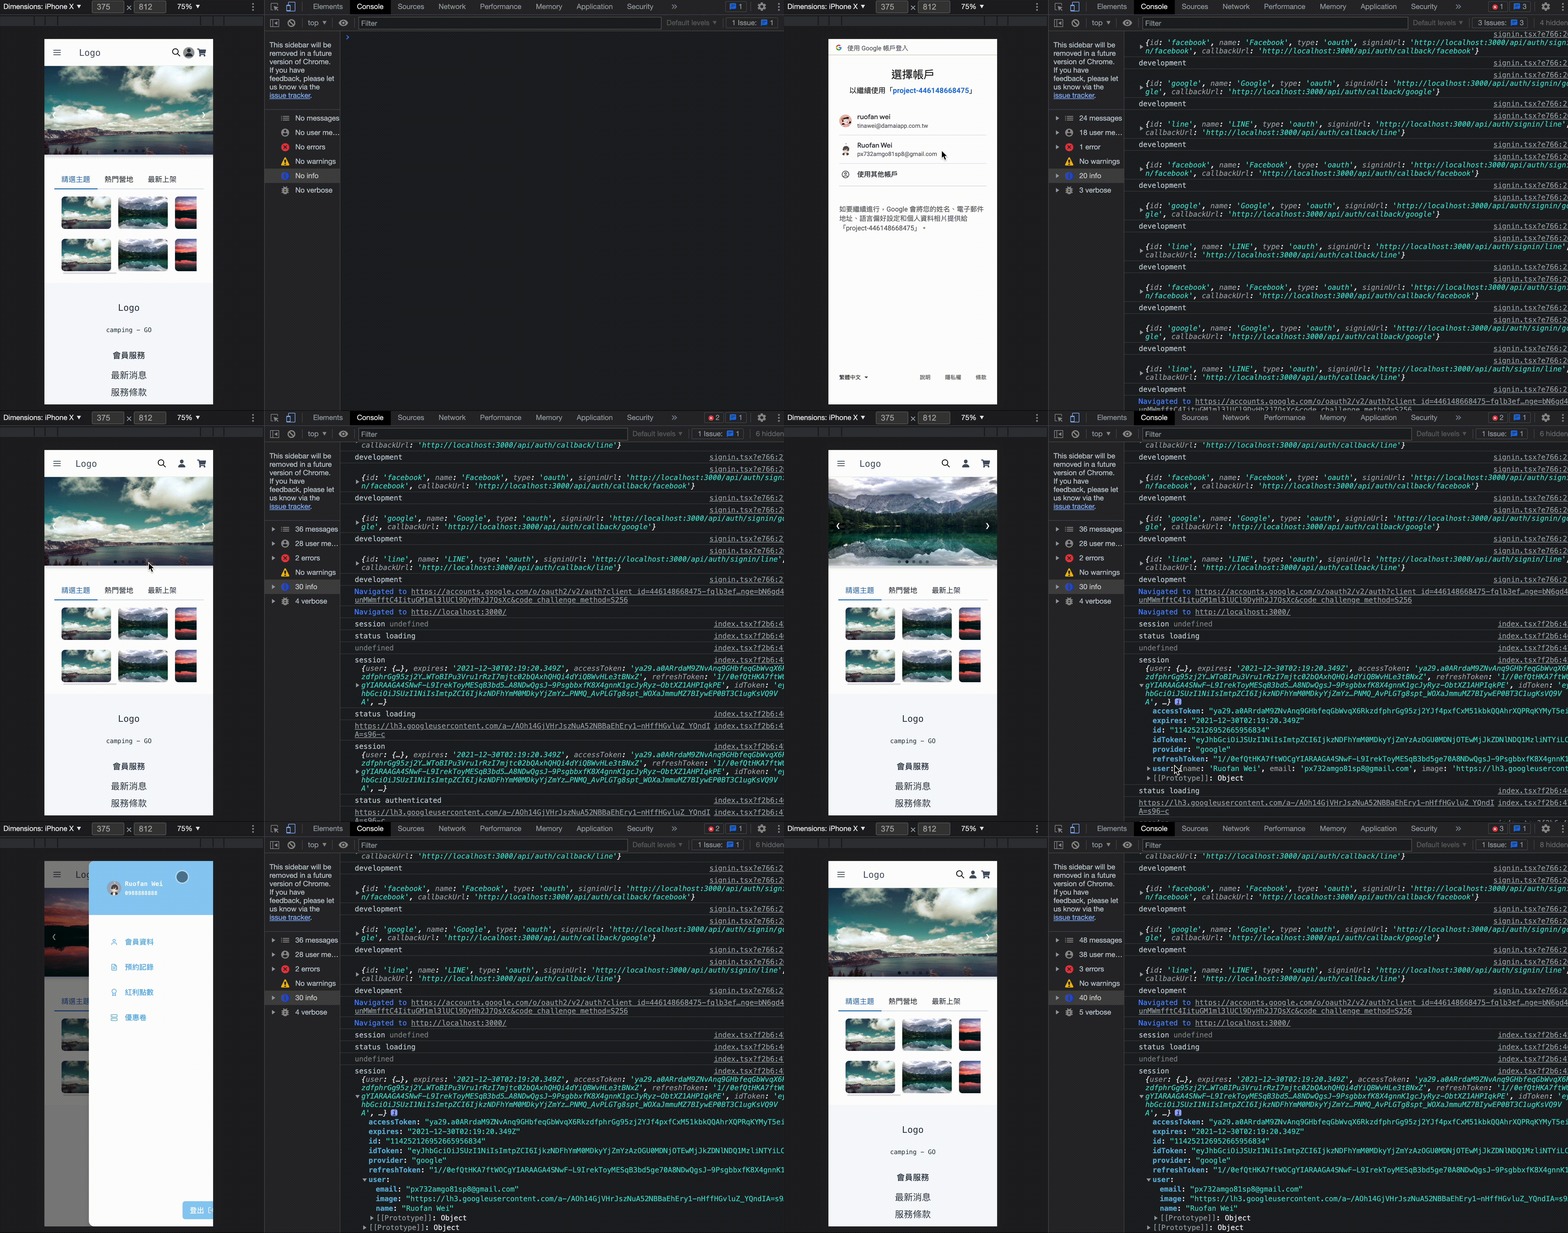
來看一下整個 login 流程吧!
# 小結
在實作過程中,環境變數以及環境設定會特別需要注意,初次使用可能會踩坑XD
整體來說,設計上蠻有彈性的!推薦給大家。
在閱讀文章時如果有遇到什麼問題,或是有什麼建議,都歡迎留言告訴我,謝謝。😃
# 參考資料
- Documentation | NextAuth
- Documentation | Manually Build a Login Flow
- Documentation | Using OAuth 2.0 to Access Google APIs
- Documentation | Integrating LINE Login with your web app
關於作者
喜歡有趣的設計
