繼 Express 之後已經很久沒有接觸新的後端框架,作為前端工程師這次因為公司專案上要過渡到 Nest 的可能性,而選擇了 Nest.js 作為這次的研究主題,希望可以透過 Nest.js 了解一些常常提到的設計實踐跟成熟工具,並從常見的 CRUD 帶大家走過 Nest 的基本操作。
# Nest 簡介
參考自官方文件的介紹,我們可以知道 Nest 是一個支援 TypeScript 開發,並結合了 OOP, FP 與 FRP 等開發元素,在底層 Express HTTP Server 框架之上,進行快速開發的 node.js 後端框架。但使用的體感上,我會說相比於 Express, Nest 是一個相對完整、嚴謹遵循著模組化 MVC 架構的後端框架。
在 Nest 之中,從程式架構的角度大致分成三個區塊:
- Controller: 負責 Request、Response 的處理。
- Provicer: 負責商業邏輯的各式 Class e.g. Service、Repository、Factory,其中 Provider 會透過依賴注入的方式來使用。
- Module: 彙整 Controller, Provider 等元件的模組 Class。
在把架構拉得更遠來看,Nest 基本上是由 Module 層層堆疊組成,最後透過 root module 彙整:
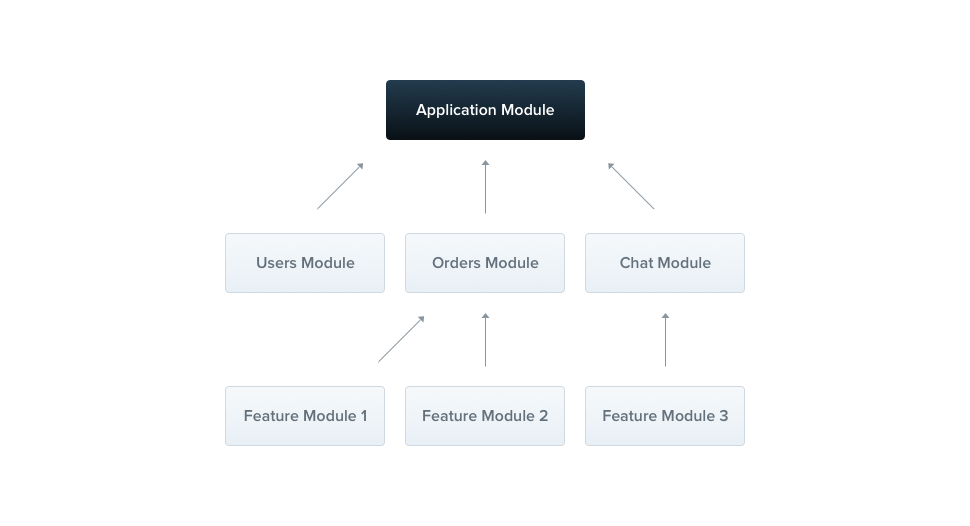
粗略瀏覽過常見 Class,接下來我們會先透過簡單的 CRUD 來示範一個 user module 以及使用對應的 typeORM 作為 repository provider 的示範,並在最後補充一些接觸的過程中覺得可以研究的概念。
# Nest CLI
同樣的 Nest 官方提供了 CLI 工具讓我們可以快速開始一個 Nest 專案,而這邊我們會使用 Nest + TypeORM 的配置來進行開發。
npm i -g @nestjs/cli
nest new login-project // 其中會提供 package manager 選擇看要選擇 npm, yarn 還是其他
從上面的 CLI 就可以簡單得到一個下列專案架構的 Nest 專案:
.
├── README.md
├── nest-cli.json
├── package.json
├── src
│   ├── app.controller.spec.ts
│   ├── app.controller.ts
│   ├── app.module.ts
│   ├── app.service.ts
│   └── main.ts
├── test
│   ├── app.e2e-spec.ts
│   └── jest-e2e.json
├── tsconfig.build.json
├── tsconfig.json
└── yarn.lock
其中 src 裡的 app.controller.ts, app.service.ts 與 app.module.ts 就是最一開始的核心模組,在這個時候我們 CLI 輸入 yarn start,到對應頁面會看到預設的 Hello World,這邊運作的方式如下:
在 controller 的架構如下
import { Controller, Get } from '@nestjs/common';
import { AppService } from './app.service';

@Controller() // 這邊可以輸入路徑相關參數
export class AppController {
  constructor(private readonly appService: AppService) {}

  @Get() // get method
  getHello(): string {
    return this.appService.getHello();  // 調用 appService 的 getHello() method
  }
}
接著在 service 裏面撰寫相關的商業邏輯:
import { Injectable } from '@nestjs/common';

@Injectable() // 由於需要告知 module 這個是依賴注入的 class,所以透過 injectable() 裝飾器裝飾。
export class AppService {
  getHello(): string { // 開發對應的商業邏輯
    return 'Hello World!';
  }
}
最後在 Module 中引入 service 跟 controller:
import { Module } from '@nestjs/common';
import { AppController } from './app.controller';
import { AppService } from './app.service';

@Module({
  imports: [],
  controllers: [AppController],
  providers: [AppService],
})
export class AppModule {}
這樣就是一個對 root route 發 get request 並回傳 Hello World API 完成了。
# 使用 TypeORM
目前有一個簡單的 API,但我們還沒有任何的 DB 資料,所以這邊我們先透過 Nest 官方支援的 TypeORM 來建立 DB。
首先安裝 TypeORM 相關的內容,並使用 typeorm init 來快速建立 typeorm 專案 :
yarn add @nestjs/typeorm typeorm mysql2
npx typeorm init
這時候會發現我們的檔案結構有一些改變,多了 entity, migration 與 ormconfig.json。
.
├── ormconfig.json
├── src
│   ├── ...
│   ├── entity
│   │   └── User.ts
│   └── migration
├─ ...
這邊 entity 是用來定義 Table 的結構,而 migration 則是 DB 更動的版本紀錄,所以簡潔一點我們可以直接接著使用 typeorm 提供的 ormconfig.json 內的設定,在 module 中引入。
import { Module } from '@nestjs/common';
import { TypeOrmModule } from '@nestjs/typeorm';
import { AppController } from './app.controller';
import { AppService } from './app.service';
import { Connection } from 'typeorm';
import { getConnectionOptions } from 'typeorm';

@Module({
  imports: [
    TypeOrmModule.forRootAsync({
	  useFactory: async () =>
	    Object.assign(await getConnectionOptions(), {
	      autoLoadEntities: true,
	    }),
	}),
  ],
  controllers: [AppController],
  providers: [AppService],
})
export class AppModule {
  constructor(private connection: Connection) {}
}
要注意的是,由於這邊我們是使用 ormconfig 在處理時間上,我們 entity 實際使用的是 ts 編譯後在 dist 中的 entity 檔案,所以在 ormconfig 中我們可以略作修改,將原先的 src 位置修改為 dist,如果今天有 migration 或 subscriber 也同理 [^1]。
{
   "type": "mysql",
   ...
   "synchronize": true,
   "logging": false,
   "entities": [
      "dist/**/*.entity.js"
   ],
   "migrations": [
      "src/migration/**/*.ts"
   ],
   "subscribers": [
      "src/subscriber/**/*.ts"
   ],
   "cli": {
      "entitiesDir": "src/entity",
      "migrationsDir": "src/migration",
      "subscribersDir": "src/subscriber"
   }
}
# CRUD
基礎內容設定完後,我們可以自行起一個 mysql server 來放資料,也可以透過 migration 來自行產生 table,不過這邊我們先從簡起一個 mysql Container,並在裡面創建我們想要的 DB 跟資料,接著回到 Nest 之中,我們可以沿用原先 init 出來的 user entity 來初步介紹 Entity 的內容:
這邊 Entity 我們可以透過不同的裝飾器來定義資料的特性,其中裝飾器都可以帶入諸如 nullable 這樣的參數去設定 Column 的內容。
import { Entity, PrimaryGeneratedColumn, Column } from 'typeorm';

@Entity()
export class User {
  @PrimaryGeneratedColumn() // 自動產生的 primary key
  id: number; // 資料型態

  @Column()
  firstName: string;

  @Column()
  lastName: string;

  @Column()
  age: number;
}
接著我們可以簡單的建立一個 User 的 CRUD Service,其中 Repository 是 TypeORM 提供的 Provider,我們可以透過 nest 官方提供的 InjectRepository 來引入對應的 User 資料對應,並且透過 Nest 規範的依賴注入的方式。
import { Injectable, HttpException, HttpStatus } from '@nestjs/common';
import { InjectRepository } from '@nestjs/typeorm';
import { Repository } from 'typeorm';
import { User } from '../entity/User.entity';
import { UpdateUserDTO } from './dto/update-student.dto';
import { CreateUserDTO } from './dto/create-user.dto';

@Injectable()
export class UserService {
  constructor(
    @InjectRepository(User) // nest 官方提供的 InjectRepository 來注入 TypeORM repository
    private usersRepository: Repository<User>,  // 宣告依賴
  ) {}

  async createUser(createUserDTO: CreateUserDTO): Promise<User> {
    return this.usersRepository.save(createUserDTO);
  }

  async findUserById(id: number): Promise<User | undefined> {
    let user: User;
    try {
      user = await this.usersRepository.findOne(id);
      if (!user) {
        throw new HttpException('user not found', HttpStatus.BAD_REQUEST);
      }
    } catch (err) {
      throw new HttpException(err, HttpStatus.INTERNAL_SERVER_ERROR);
    }
    return user;
  }

  async updateUser(id: number, updateUserDTO: UpdateUserDTO): Promise<boolean> {
    const foundUser = await this.usersRepository.findOne(id);
    if (!foundUser) {
      throw new HttpException('user not found', 404);
    }
    return (await this.usersRepository.save({
      ...foundUser,
      ...updateUserDTO,
    }))
      ? true
      : false;
  }

  async deleteUser(id: number): Promise<boolean> {
    const foundUser = await this.usersRepository.findOne(id);

    if (!foundUser) {
      throw new HttpException('User not found.', 404);
    }

    return (await this.usersRepository.delete(id)) ? true : false;
  }
}
這個過程中我們可以透過 DTO 去要求更新的資料格式,以 create User DTO 為例,而 DTO 的錯誤判斷也可以透過前面提到資料流中提供的不同 Class 去做錯誤處理。
import { IsString, IsOptional, IsNotEmpty } from 'class-validator';

export class CreateUserDTO {
  @IsString()
  @IsNotEmpty()
  readonly firstName: string;

  @IsNotEmpty()
  @IsString()
  readonly lastname: string;

  @IsOptional()
  readonly age: numbder;
}
最後我們在 user controller 中宣告 userService 依賴,並且利用 Nest 提供的 Express 方法,來對應不同的 Method 調用 userService。
import {
  Controller,
  Response,
  Get,
  HttpStatus,
  Param,
  Patch,
  Body,
  Delete,
  Post,
} from '@nestjs/common';
import { UserService } from './user.service';
import { UpdateUserDTO } from './dto/update-student.dto';
import { CreateUserDTO } from './dto/create-user.dto';

@Controller('users') // 設定 route e.g. localhost:3000/users
export class UserController {
  constructor(private userService: UserService) {}

  @Post() // 設定 method
  async createUser(@Body() createUserDTO: CreateUserDTO, @Response() res) {
    try {
      await this.userService.createUser(createUserDTO);
      res.status(HttpStatus.OK).json({ status: 'success' });
    } catch (error) {
      console.error(error);
      res.status(HttpStatus.INTERNAL_SERVER_ERROR);
    }
  }

  @Get('/:id')
  async getUser(@Response() res, @Param('id') id) {
    try {
      const user = await this.userService.findUserById(id);
      res.status(HttpStatus.OK).json(user);
    } catch (error) {
      console.error(error);
      res.status(HttpStatus.INTERNAL_SERVER_ERROR);
    }
  }

  @Patch('/:id')
  async updateUser(
    @Response() res,
    @Param('id') id,
    @Body() updateUserDTO: UpdateUserDTO,
  ) {
    try {
      const isUpdate = await this.userService.updateUser(id, updateUserDTO);
      res.status(HttpStatus.OK).json({ status: isUpdate ? 'success' : 'fail' });
    } catch (error) {
      res.status(HttpStatus.INTERNAL_SERVER_ERROR);
    }
  }
  @Delete('/:id')
  async deleteUser(@Response() res, @Param('id') id) {
    try {
      const isDelete = await this.userService.deleteUser(id);
      res.status(HttpStatus.OK).json({ status: isDelete ? 'success' : 'fail' });
    } catch (error) {
      res.status(HttpStatus.INTERNAL_SERVER_ERROR);
    }
  }
}
最後透過 user.module 去做彙整,要注意的是 TypeOrmModule 需要另外透過 forFeature 來引入 User Model。
import { Module } from '@nestjs/common';
import { TypeOrmModule } from '@nestjs/typeorm';
import { UserController } from './user.controller';
import { UserService } from './user.service';
import { User } from './entities/user.entity';

@Module({
  imports: [TypeOrmModule.forFeature([User])],
  controllers: [UserController],
  providers: [UserService],
  exports: [UserService],
})
export class UserModule {}
最終在 app.module 加入我們的 user.module 即大功告成:
import { Module } from '@nestjs/common';
import { TypeOrmModule } from '@nestjs/typeorm';
import { AppController } from './app.controller';
import { AppService } from './app.service';
import { UserModule } from './modules/user.module';
import { Connection } from 'typeorm';
import { getConnectionOptions } from 'typeorm';

@Module({
  imports: [
    TypeOrmModule.forRootAsync({
	  useFactory: async () =>
	    Object.assign(await getConnectionOptions(), {
	      autoLoadEntities: true,
	    }),
	}),
	UserModule
  ],
  controllers: [AppController],
  providers: [AppService],
})
export class AppModule {
  constructor(private connection: Connection) {}
至此我們 src 檔案結構如下:
.
├── src
│   ├── app.controller.spec.ts
│   ├── app.controller.ts
│   ├── app.module.ts
│   ├── app.service.ts
│   ├── entity
│   │   └── User.ts
│   ├── index.ts
│   ├── main.ts
│   ├── migration
│   └── modules
│       └── user
│           ├── user.controller.ts
│           ├── user.module.ts
│           └── user.service.ts
以上就是一個最簡單的 CRUD Server,這個過程我們也可以透過 Nest CLI e.g. nest g controller user 來幫我們建立各個 Class 基本模板,但這邊還是透過一個個檔案走過來了解 Nest 的架構。
# Nest 中重要觀念
其中 Nest 在接觸時有一些過去比較沒有接觸到的觀念,在下方一一去做研究跟補充:
# 依賴注入
在進入說明資料流之前,這邊想要了解一下依賴注入 (DI) 的概念 :
今天 A, B 兩 Class,A Class 內有直接產生 B Class 的實例,所以 A 依賴 B,如果今天 B 有修改、A 也要跟著改。
所以如果今天想要解決這個問題,做到所謂的「控制反轉」(IoC) 其中一種做法透過一個注入容器 C Class 來負責建立 B 的內容,讓 A 使用 C 來呼叫 B。這樣就不用因為 B 的修改影響到 A 的內容,因為 C 這個中間容器會去處理要依賴對象的調度。
用一個比喻來說,今天 A 跟 B 是情侶,A 是黏黏怪所以依賴 B,但如果今天 A、B 是一個合情合意的開放式關係,B 讓 A 使用交友軟體,那今天 A 只要跟交友軟體輸入自己的偏好,然後找到喜歡的人就可以了。此時的「交友軟體」就是注入容器,負責接收 A 發出的需求,找到像 B 一樣的人。
而用 Nest 的狀況來說今天過去我們要在 Controller 中直接創建 Service 的實例,但 Nest 透過 Module 這個中間 IoC 容器幫我們處理了 Service 的宣告,我們只要讓 Controller 引入對應的 Interface 並宣告 [^2]。
首先在 user.service.ts 建立 user 相關的操作邏輯,例如:回傳所有 users 的 findAll()。這邊由於 usersService 透過 @Injectable 修飾器修飾過後,宣告 usersService 是可以被 Module 做 IoC 處理的 Container。
import { Injectable } from '@nestjs/common';
import { User } from './interfaces/user.interface';

@Injectable()
export class usersService {
  private readonly users: User[] = [];

  findAll(): User[] {
    return this.users;
  }
}
接著在 user.controller.ts 中提供 service Class 在 constructor 中宣告依賴。
import { Controller, Get } from '@nestjs/common';
import { UsersService } from './users.service';
import { User } from './interfaces/user.interface';

@Controller('users')
export class UsersController {
  constructor(private usersService: UsersService) {}

  @Get()
  async findAll(): Promise<User[]> {
    return this.usersService.findAll();
  }
}
最後在 user.module.ts 這個 IoC 容器中引入會使用到的 Provider - usersService 來做依賴注入。當 Nest 要創建 UsersController 的實例的時候,他會先確認有沒有任何依賴的內容在 constructor 中,若有,他會搜尋有沒有 UsersService 的內容在 IoC 中,若有,才會去創建 UsersService 的實例來回傳。
import { Module } from '@nestjs/common';
import { UsersController } from './users/users.controller';
import { UsersService } from './users/users.service';

@Module({
  controllers: [UsersController],
  providers: [UsersService],
})
export class AppModule {}
這樣我們就可以隨時修改或增添相關的 Provider 並透過中間的 module 去做管理,上面的原始碼會再整理到這邊 供大家做參考。
# Entity vs DTO
在定義回傳或傳入的型別時,一直很猶豫要使用 Entity 還是 DTO? 這兩者又有什麼不同?根據 Stack Overflow 的討論 [^3]
Entities may be part of a business domain. Thus, they can implement behavior and be applied to different use cases within the domain. DTOs are used only to transfer data from one process or context to another. As such, they are without behavior - except for very basic and usually standardised storage and retrieval functions.
我的理解是,最能代表 DB 邏輯的型別是 Entity,而用於資料流一路通過不同階段的型態,則用 DTO。而於開發應用情境上來說,最理想的應該是 request 從 controller 一路到 service 都使用 DTO 去定義規範,但要送進 DB 或剛從 DB 撈出來的時候應維持 Entity 的型別。
以上是個人的理解,如果有一些疏漏再請大家多多補充。
# 小結
以上是 Nest CRUD 的初探索,而其實 Nest 在換一個角度,根據資料流還有提供許多我們可以參考這張圖來看一趟資料流會經過哪些階段:

下一篇文章希望可以跟著資料流,接著探索 Nest 提供的其他 Class,並基於 User Service 延伸出一個簡單的 Auth 服務。
# 參考資料
- Documentation | NestJS - A progressive Node.js framework
- [^1]: TypeORM Entity in NESTJS - Cannot use import statement outside a module - Stack Overflow
- [^2]: 3、Nest.js 中的依赖注入与提供者 - 简书
- [^3]: java - Difference between Entity and DTO - Stack Overflow
- [^4]: node.js - NestJS Do I need DTO's along with entities? - Stack Overflow
關於作者
著迷於設計工程之間的有趣事情