Hi,大家好!前陣子在研究可以為 api 做 Load Testing 的工具。
如果你對於這個工具感到好奇,可以看看這篇。
# 什麼是 k6 ?
以下為 k6 官方文件上對自己的介紹:
k6 is a developer-centric, free and open-source load testing tool built for making performance testing a productive and enjoyable experience.
Using k6, you'll be able to catch performance regression and problems earlier, allowing you to build resilient systems and robust applications.
簡單來說,k6 是一個開源的 api 負載測試工具,下方圖片中區分出不同類型的api 測試,出自於 k6 官方文件。
如果想認識不同類型的 api 測試之間的差異推薦去看官方文件,這次會實作的部分是 (For performance) Load testing。

特別值得注意的是,因為 k6 是用 Go 撰寫的,如果需要引用其他 node module 搭配 k6 做測試的話,會需要使用 Webpack 打包工具以及 Babel 編譯。
# 開始實作吧!
首先會需要安裝 k6,這邊會以 mac 透過 Homebrew 安裝為例:
$brew install k6這邊會用 fake.js 套件產生假資料協助測試,因此也會實作打包與編譯設定檔的部分。
npm install
  @babel/core \
  @babel/preset-env \
  babel-loader \
  core-js \
  webpack \
  webpack-cli
這邊先分享一下接下來實作的檔案結構配置。
├── dist
│   ├── test.index.js
│   └── test.index.js.map
│
├── utils
│   ├── faker.js
│   ├── generateData.js
│   └── testing.js
│
├── webpack.config.js
├── .babelrc
└── package.json
接著設定 webpack config 檔案
讀者如果想要試著實作的話,這邊的設定檔只需要更改 entry file 的路徑。
打包完的檔案會出現在 dist 的資料夾中,最後在跑 script 的時候只需要跑 dist 中產生出來的檔案。
# webpack.config.js
const path = require("path")

module.exports = {
  mode: "development",
  entry: {
    "index": "./utils/testing"
  },
  output: {
    path: path.resolve(__dirname, "dist"),
    filename: "test.[name].js",
    libraryTarget: "commonjs",
  },
  module: {
    rules: [{ test: /\.js$/, use: "babel-loader", exclude: /node_modules/ }],
  },
  stats: {
    colors: true,
    warnings: false,
  },
  target: "node",
  externals: [/k6(\/.*)?/],
  devtool: "source-map",
}
還有 .babelrc 檔案
# .babelrc
{
  "presets": [
    [
      "@babel/preset-env",
      {
        "useBuiltIns": "usage",
        "corejs": 3
      }
    ]
  ],

}
稍微調整一下 package.json 中的 script
這邊在 script 中使用的 pretest ,其中的 pre 能夠讓每次在跑 npm run test 這個 script 的時候都會先重新打包。
關於 script 的其他用法可以參考npm doc。
# package.json
{
  "name": "functions",
  "scripts": {
    "pretest": "webpack",
    "test": "k6 run ./dist/test.index.js"
  },

}
設定好打包與編譯的工具後就可以安裝 faker.js 了!
$npm install faker這邊先和大家分享一下,在使用 faker.js 套件產生假資料時,筆者踩過的雷 💀
就是,這個套件產生的假資料是有蠻高機會重複的!但是當你產生的資料需要是唯一的時候,該怎麼辦呢 ?!
目前我的解決方式是:
# faker.js
import * as faker from "faker/locale/en_US"

faker.seed(Math.floor(100000000000000000 * Math.random()))

export { faker }
如果大家有更好的解決方式,歡迎分享讓我知道!
接著,設定產生假資料的檔案
# generateData.js
import {faker} from "./faker"
export const generateStores = () => ({
  contactPerson: faker.name.lastName(),
  storeName: faker.company.bsBuzz(),
  storeSlug: faker.random.word(),
  address: faker.address.country(),
  customerServicePhone: faker.phone.phoneNumber(),
  account: faker.internet.email(),
  password: faker.internet.password(),
  companyName: faker.company.bsBuzz(),
  liffid: faker.datatype.uuid(),
})
處理完假資料後,就可以開始實作測試檔案!
options 可以讓我們設定如何在 k6 執行測試,以下方範例測試檔為例:
scenarios 是測試的情境
這邊使用了 constant-arrival-rate 來執行,也就是固定一個數量的虛擬用戶在設定的一段時間內執行測試api。
preAllocatedVU 是指在跑測試之前預先配置的虛擬用戶數量,這個設定能夠讓測試執行得更有效率。
其他的設定就會比較好理解了,大意上是指在一分鐘內每隔 15 秒就會去打一次 api。
此外,這邊特邊需要注意的是在k6使用環境變數的方式
以下方的測試檔來說,我使用了 LOCAL_HOSTNAME 這個環境變數,在跑 script 的時候就會需要帶上這個環境變數的值。
# package.json
{
  "name": "functions",
  "scripts": {
    "pretest": "webpack",
    "test": "k6 run -e LOCAL_HOSTNAME=test/api ./dist/test.index.js"
  },

}
# testing.js
import http from "k6/http";
import { check, sleep } from "k6";
import { generateStores } from './generateData';

// define url
const baseUrl = `http://${__ENV.LOCAL_HOSTNAME}`;
const urls = {
  createStore: `${baseUrl}/store`,
};

export let options = {
  scenarios: {
    constant_request_rate: {
      executor: "constant-arrival-rate",
      rate: 1,
      timeUnit: "15s", // 1 iterations per 15 second
      duration: "1m",
      preAllocatedVUs: 5, // how large the initial pool of VUs would be
    },
  },
};

const createStoreApi = () => {
  const store = generateStores();
  const payload = JSON.stringify(store);

  const params = {
    headers: {
      "Content-Type": "application/json",
    },
    tags: { k6test: "🔥" },
  };
  const createStoreResult = http.post(urls.createStore, payload, params);

  check(createStoreResult, {
    "status is 200": (res) => res.status === 200,
  });
}

export default function () {
  createStoreApi()
  sleep(1);
}
# 執行結果
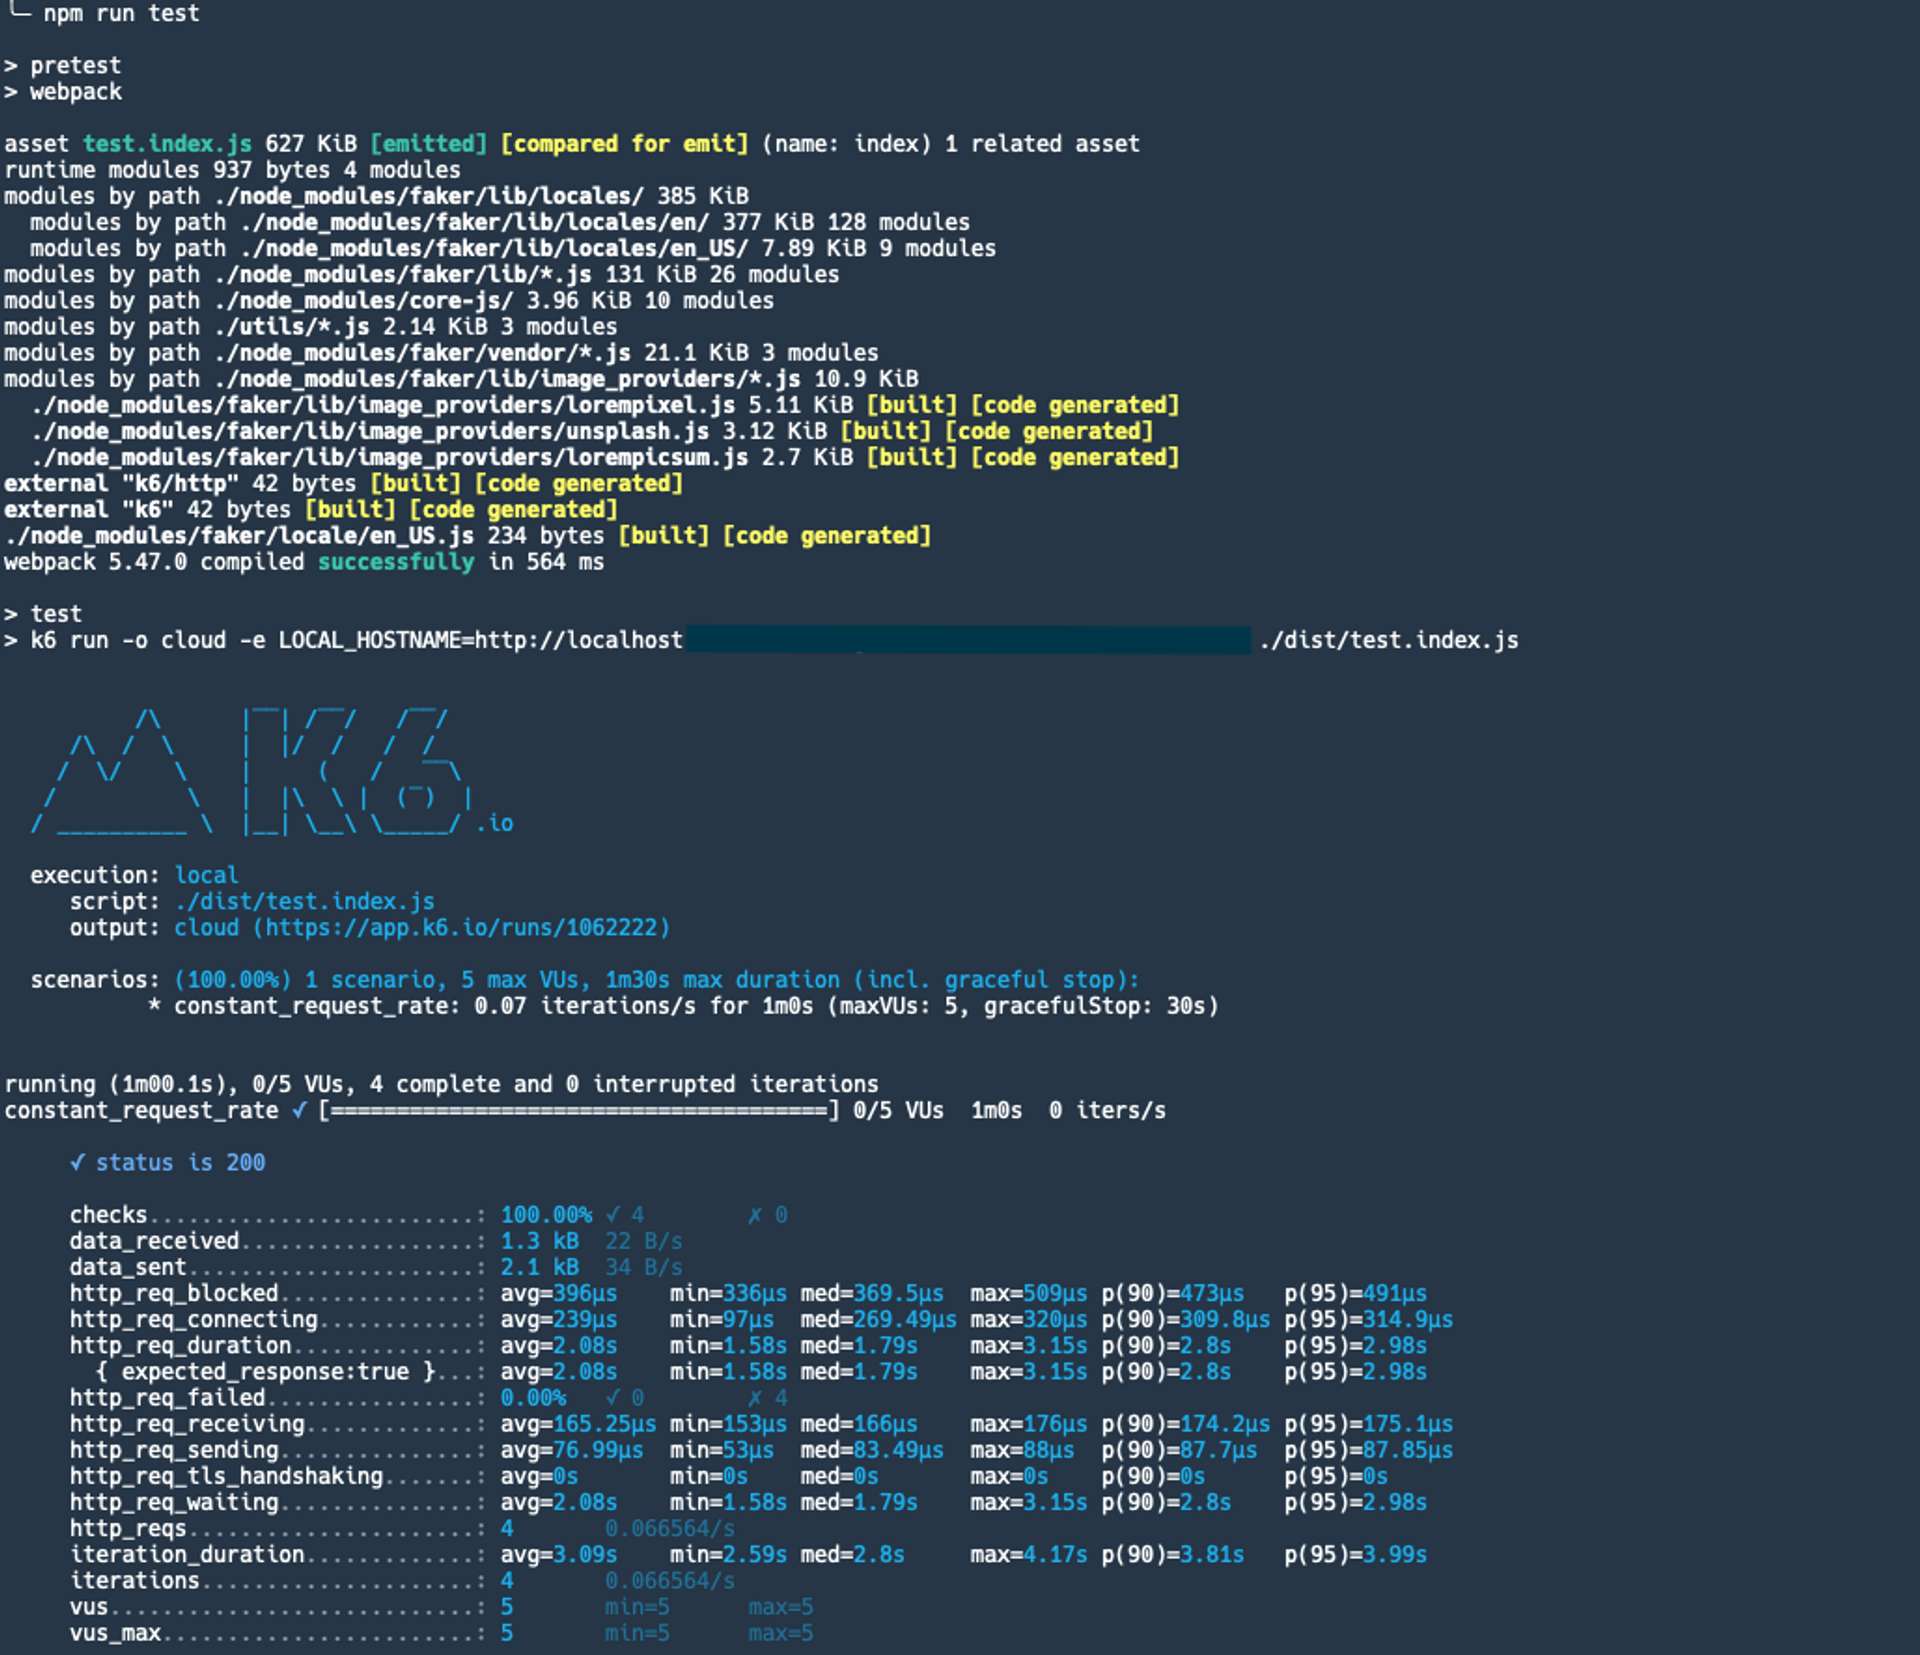
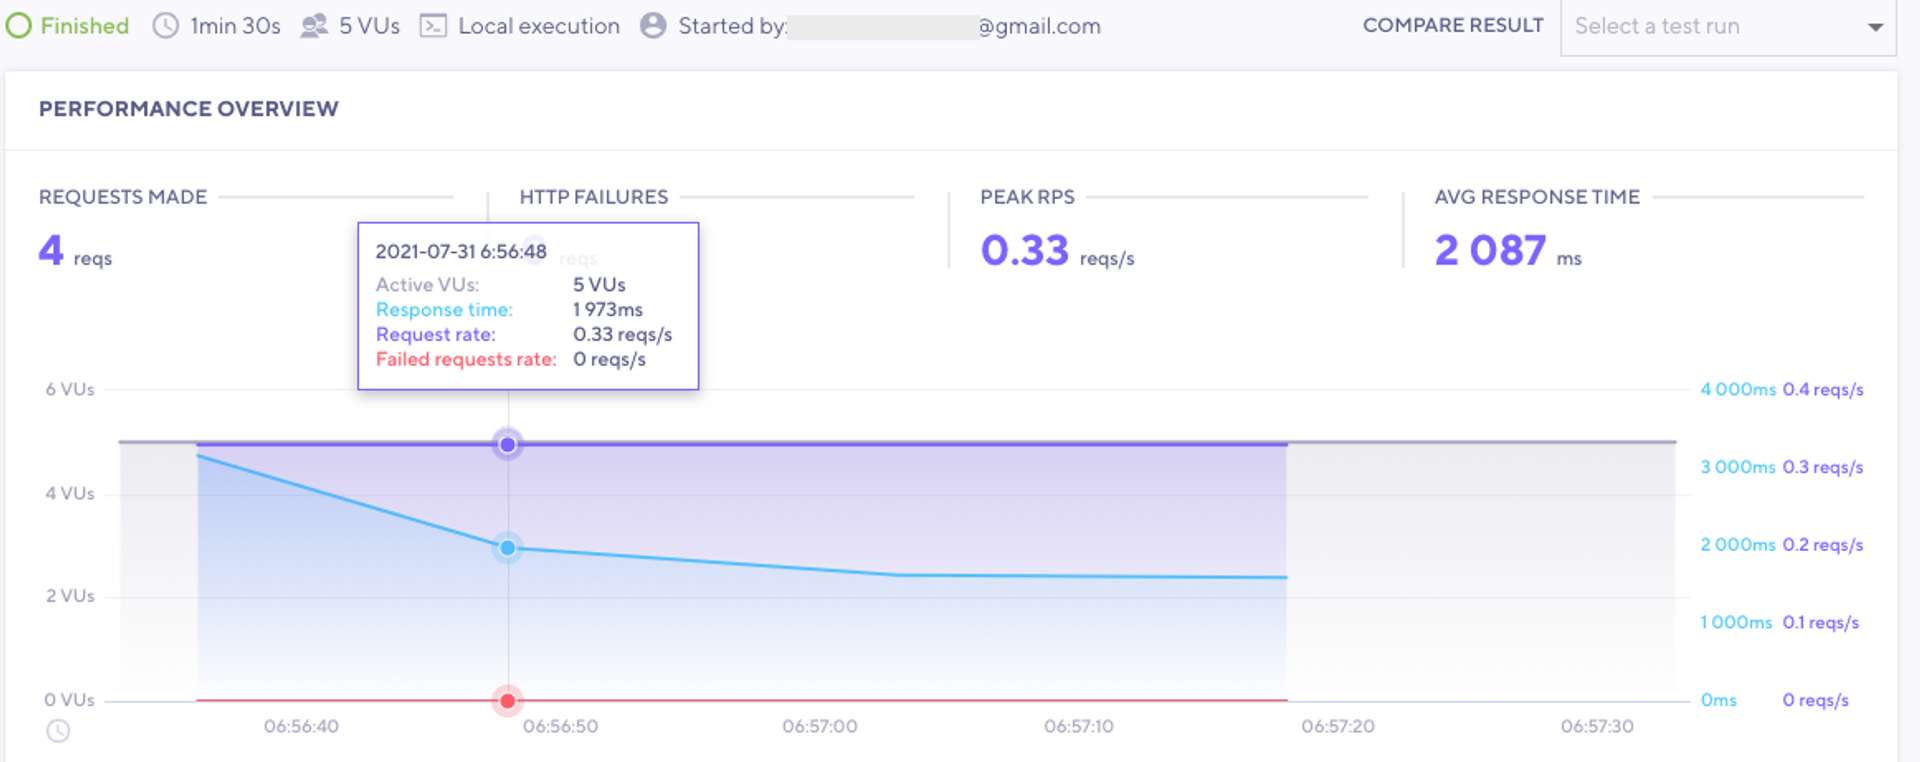
跑完測試後可以在終端機或是 k6 cloud 看到的資料,透過分析後的數據可以評估 api 反應時間是否能夠滿足需求定義時間,找出可以優化的方向。
下方圖片是終端機跑完測試後印出來的資料。

下方圖片是 k6 cloud 上把資料視覺化後的圖表。
如果想把測試顯示在 k6 cloud 上的話,免費的使用額度是有限制的。

# 結語
在還沒有流量但又需要測試 api 的效能或是負載時,k6 是一個很不錯的工具!
並且可以根據不同情境做不同測試,想研究其他更多設定的話,可以參考 k6 的文件跟官網:https://k6.io/docs/
在閱讀文章時如果有遇到什麼問題,或是有什麼建議,都歡迎留言告訴我,謝謝。😃
關於作者
喜歡有趣的設計
