Hi 大家好,過完美好的春節連假,扎實的充飽了電! 實作 Infinite Scroll 有幾種方法,這篇文章會帶著大家透過 Vue 認識兩個實作 Infinite Scroll 的方法。
# 方法一 : 透過監聽 scroll 搭配 throttling ,偵測滑動到底部時拿取更多資料
監聽 scroll 這邊使用到的是 window event handler 中的 onscroll 方法。從 html specification 中可以認識到更詳細的說明。 讓我們一起來從下方的程式碼來看一下實作方法吧!
先來看一下這邊如何偵測滑動到底部
a. 透過document.documentElement.offsetHeight可以拿到 document 中 root element 本身的高度。
b.window.innerHeight是瀏覽器視窗的高度。
c. 搭配Math.max()方法讓我們拿到window.pageYOffset,document.documentElement.scrollTop,document.body.scrollTop中捲軸的捲動高度最大值。如果滾動區域只有在畫面中一小區塊呢?
可以從下方的圖片觀察出計算方法。
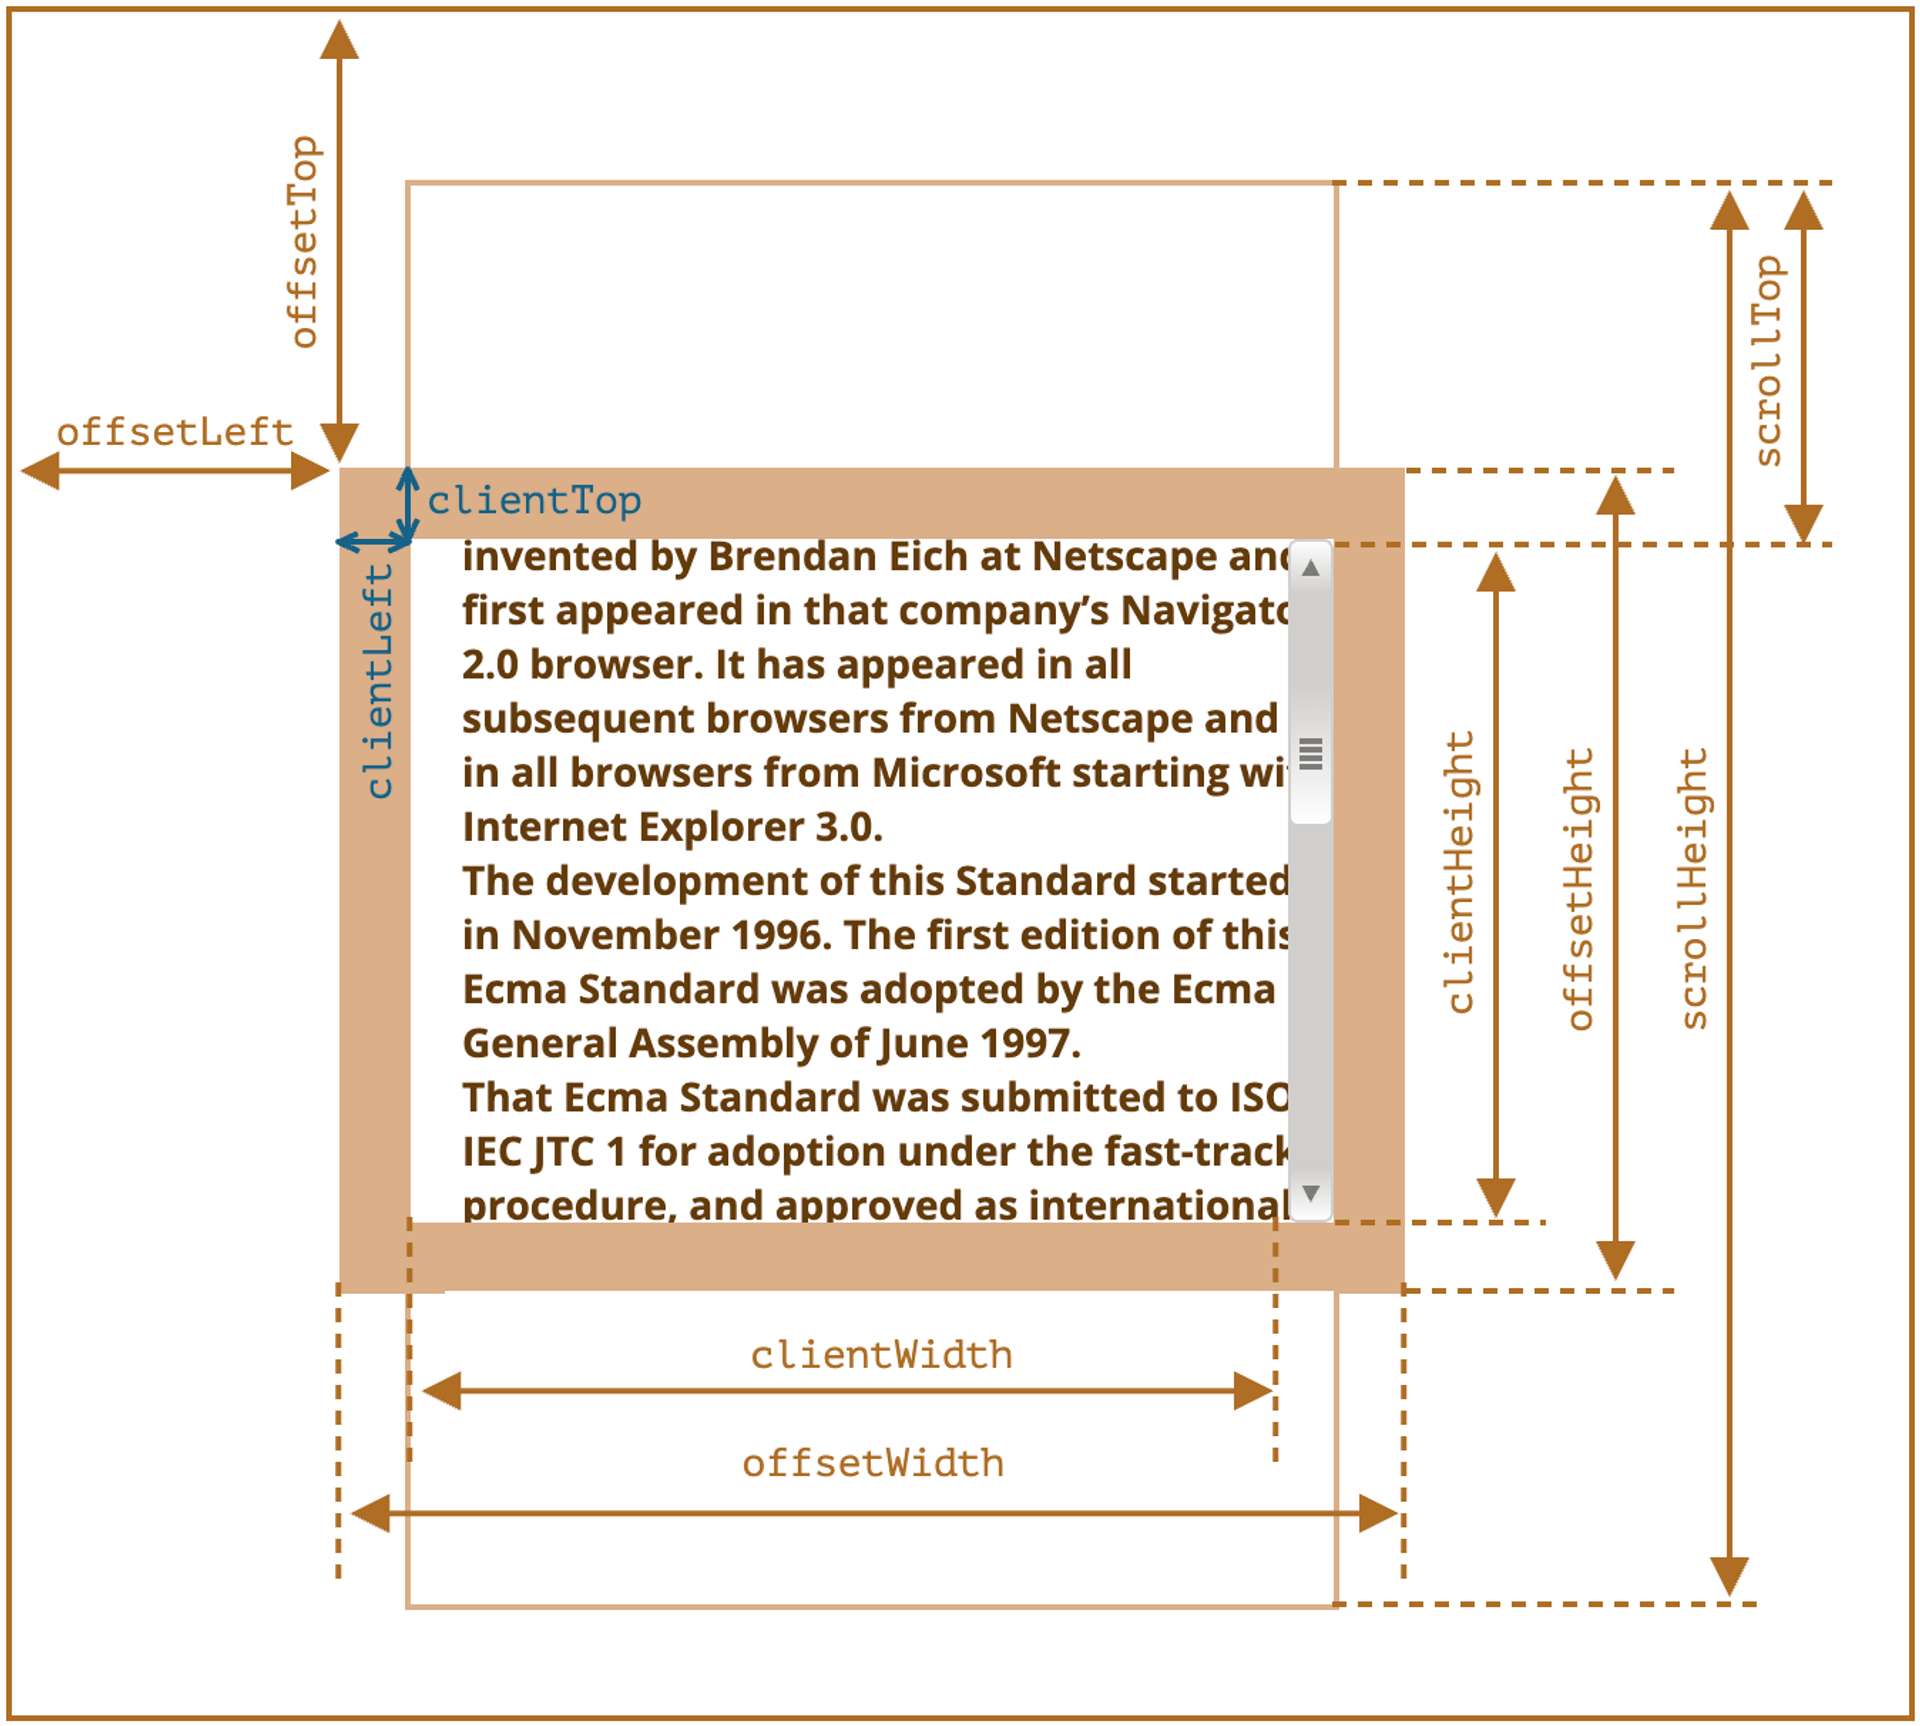
圖片來源: javascript.infothrottling的概念是在時間區間內,只會發出一次請求。
a. 這邊透過Promise搭配setTimeout()方法來實作像是sleep的方法。
<template class=" bg-gray-100 h-screen">
  <nav
    class="
      bg-neutral-200
      shadow
      font-mono
      p-4
      font-bold
      text-amber-900
      w-screen
      fixed
      top-0
      left-0
      right-0
    "
  >
    Infinite Scroll
  </nav>
  <div class="p-14">
    <div ref="list" class="overflow-scroll">
      <div
        v-for="product in products"
        :key="product.id"
        class="p-5 font-mono text-primary  leading-10"
      >
        <div>
          { product.title }
          <div>$ { product.price }</div>
          <div class="text-gray-400">{ product.description }</div>
        </div>
      </div>
    </div>
    <div  class="flex justify-center p-10">
      <Loading v-show="loading"/>
    </div>
  </div>
</template>

<script lang="ts">
import { computed, defineComponent, onMounted} from 'vue'
import { useStore } from 'vuex'
import Loading from '@/components/Loading.vue'

export default defineComponent({
  name: 'App',
  components:{
    Loading
  },
  setup: () => {

    const store = useStore()
    const loading = computed(() => store.getters['loading'])
    const products = computed(() => store.getters['products'])

    onMounted(() => {
      store.dispatch('GET_PRODUCT')
      intersectionObserver()
    })
    function intersectionObserver() {
      window.onscroll = () => {
        const bottomOfWrapper =
          Math.max(
            window.pageYOffset,
            document.documentElement.scrollTop,
            document.body.scrollTop
          ) +
            window.innerHeight ===
          document.documentElement.offsetHeight

        if (bottomOfWrapper) {
          store.commit('nextPage')
          setTimeout(() => {
            store.dispatch('LOAD_MORE_PRODUCT')
          }, 1000)
        }
      }
    }
    return {
      products,
      loading

    }
  },
})
</script>
完整程式碼可以透過這個 Repository (event-listeners) 觀看。
# 方法二 : 透過 Intersection Observer API 偵測 element 進入 viewport 時拿取資料
以下是 Intersection Observer API 在 MDN 上的說明:
provides a way to asynchronously observe changes in the intersection of a target element with an ancestor element or with a top-level document's viewport.
讓我們一起來從下方的程式碼來看一下實作方法吧!
Observer.vue
- 這邊把
Observe獨立成一個元件,因為在專案中可能會遇到有多個地方會需要使用同樣的方法。 - 當
entry.isIntersecting成立時透過context.emit('intersect')方法傳遞到外層元件,讓外層元件進行拿取資料的動作。
<template>
  <div ref="target" class="target" />
</template>

<script lang="ts">
import { defineComponent, onMounted, ref, onBeforeUnmount } from 'vue'
export default defineComponent({
  name: 'Observer',
  setup: (props, context) => {
    let observer: IntersectionObserver
    const target = ref()
    onMounted(() => {
      observer = new IntersectionObserver(([entry]) => {
        if (entry.isIntersecting) {
          context.emit('intersect')
        }
      })
      observer.observe(target.value)
    })
    onBeforeUnmount(() => {
      observer.disconnect()
    })
    return {
      target,
    }
  },
})
</script>
App.vue
- 透過
store.dispatch('GET_PRODUCT', limit.value)來實作分頁拿取資料。
<template class=" bg-gray-100 h-screen">
  <nav
    class="
      bg-neutral-200
      shadow
      font-mono
      p-4
      font-bold
      text-amber-900
      w-screen
      fixed
      top-0
      left-0
      right-0
    "
  >
    Infinite Scroll
  </nav>
  <div class="p-14 h-screen">

      <div
        v-for="product in products"
        :key="product.id"
        class="pb-5 pt-5 font-mono text-primary leading-10"
      >
        <div>
          { product.title }
          <div>$ { product.price }</div>
          <div class="text-gray-400">{ product.description }</div>
        </div>
      </div>

    <div class="flex justify-center p-10 h-32">
      <Loading v-show="loading" />
    </div>

    <Observer @intersect="intersected" />
  </div>
</template>

<script lang="ts">
import { computed, defineComponent, ref } from 'vue'
import { useStore } from 'vuex'
import Loading from '@/components/Loading.vue'
import Observer from '@/components/Observer.vue'
export default defineComponent({
  name: 'App',
  components: {
    Loading,
    Observer,
  },
  setup: () => {
    const store = useStore()
    const limit = ref(5)
    const loading = computed(() => store.getters['loading'])
    const products = computed(() => store.getters['products'])
    const total = computed(() => store.getters['total'])
    function intersected() {
        if (products.value.length >= total.value) return
        store.dispatch('GET_PRODUCT', limit.value)
        limit.value += 5
    }
    return {
      products,
      loading,
      intersected,
    }
  },
})
</script>
完整程式碼可以透過這個 Repository (Intersection-Observer) 觀看。
# 小結
實作完兩個方法後,會很驚喜的發現 Intersection Observer API 的美好,以下是筆者的觀察:
不需要去計算出
scroll到底部的部分,在不同的頁面上可以共用同一個observe元件。因為沒有監聽的行為,拿取更多資料的時候不需要實作
throttling,在使用者體驗上不會有延遲感,但是如果想特別設計等待的延遲感,使用Intersection Observer API方法一樣可以彈性的透過setTimeout()來實現。下方是
event-listeners的實作 demo
下方是
Intersection Observer API的實作 demo
在閱讀文章時如果有遇到什麼問題,或是有什麼建議,都歡迎留言告訴我,謝謝。😃
# 參考資料
- Documentation | javascript.info
- Documentation | Intersection Observer API
- Documentation | Vuex
- Documentation | Vuejs
關於作者
喜歡有趣的設計