Hi,大家好! 前陣子在研究使用 Firebase Cloud Messaging 傳送通知到 web。 這篇文章會和大家分享如何搭配 service worker 實作。
# 什麼是 Firebase Cloud Messaging?
以下是 Firebase 官方文件 上的說明。
Firebase Cloud Messaging (FCM) is a cross-platform messaging solution that lets you reliably send messages at no cost.
透過 FCM 讓我們可以以低成本的方式傳送訊息到 web 或是 app。 這邊以 web 為例,使用者的瀏覽器以及通知設定在開啟的前提下,是可以收到通知的。
這個功能如此低成本看似相當方便,但是還是有許多額外需要注意的地方。 iPadOS and iOS 15.4 web Push Notifications 還在實驗階段,目前預設是 disabled,因此這部分的實作不適用在 iphone 以及 ipod。 詳細資訊可以看 safari Release Notes
# push Notifications 在 web 上是如何運作的?
透過瀏覽器背後實作的 push service,搭配 service worker 收取與產生通知給使用者。
從下方的圖片上可以觀察到各家瀏覽器對於 notification 的支援度。
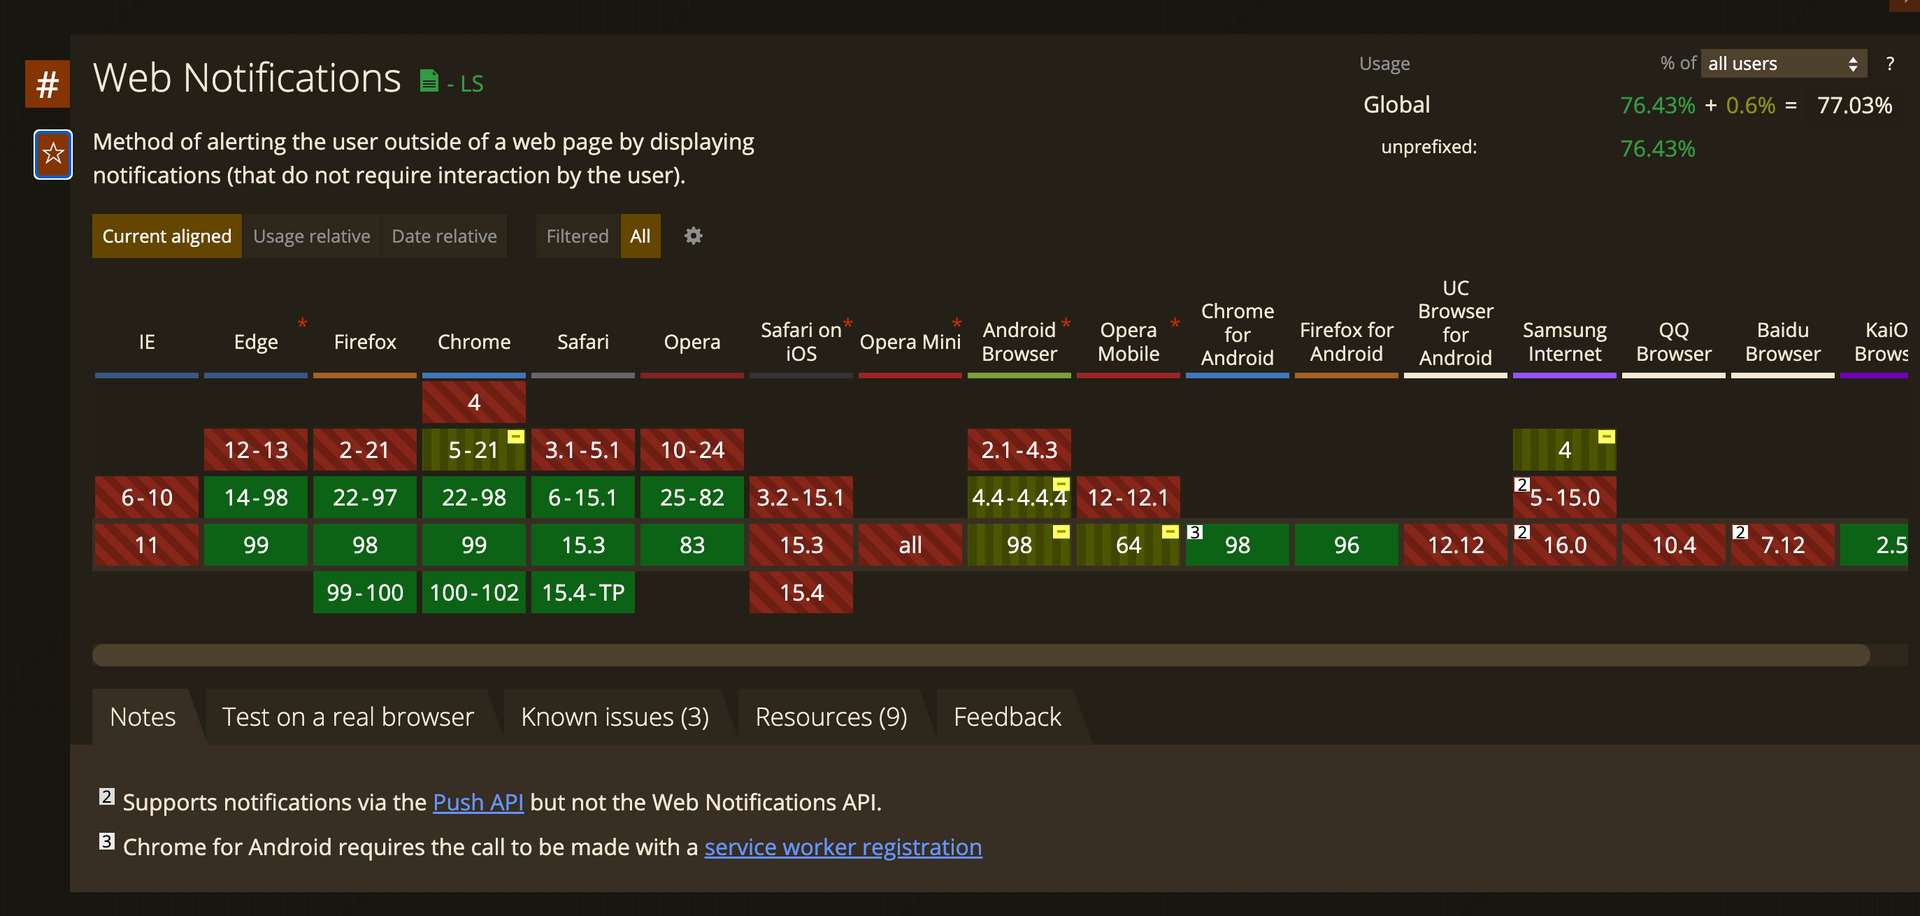
圖片來源: caniuse
# 什麼是 Service worker?
service worker 是 web worker API 中的其中一種 worker。
以下是 mdn web docs 上的說明。
Web Workers makes it possible to run a script operation in a background thread separate from the main execution thread of a web application.
Service Workers offering offline capabilities, including handling notifications, performing heavy calculations on a separate thread, etc. Service workers are quite powerful as they can take control over network requests, modify them, serve custom responses retrieved from the cache, or synthesize responses completely.
當 web 收到訊息後需要啟用 service worker 來收取通知,我們可以透過 service worker API 中提供的 register 與 skipWaiting 方法來下載與啟用 service worker。 產生通知給使用者則是透過 Notifications API。
  if ("serviceWorker" in navigator) {
        window.navigator.serviceWorker
          .register("/firebase-messaging-sw.js")
          .then(
            function (registration) {
              const title = 'SEND NOTIFICATION FROM CLICK EVENT'
              const body = 'send background message from click event'
              registration.showNotification(title, {body})
            },
            /*catch*/ function (error) {
              console.log("Service worker registration failed:", error);
            }
          );
      } else {
        console.log("Service workers are not supported.");
}self.addEventListener("message", (event) => {
if (event.data && event.data.type === "SKIP_WAITING") self.skipWaiting();
});# 開始實作吧!
在 firebase console 中的網路設定取得網路推播憑證的金鑰。
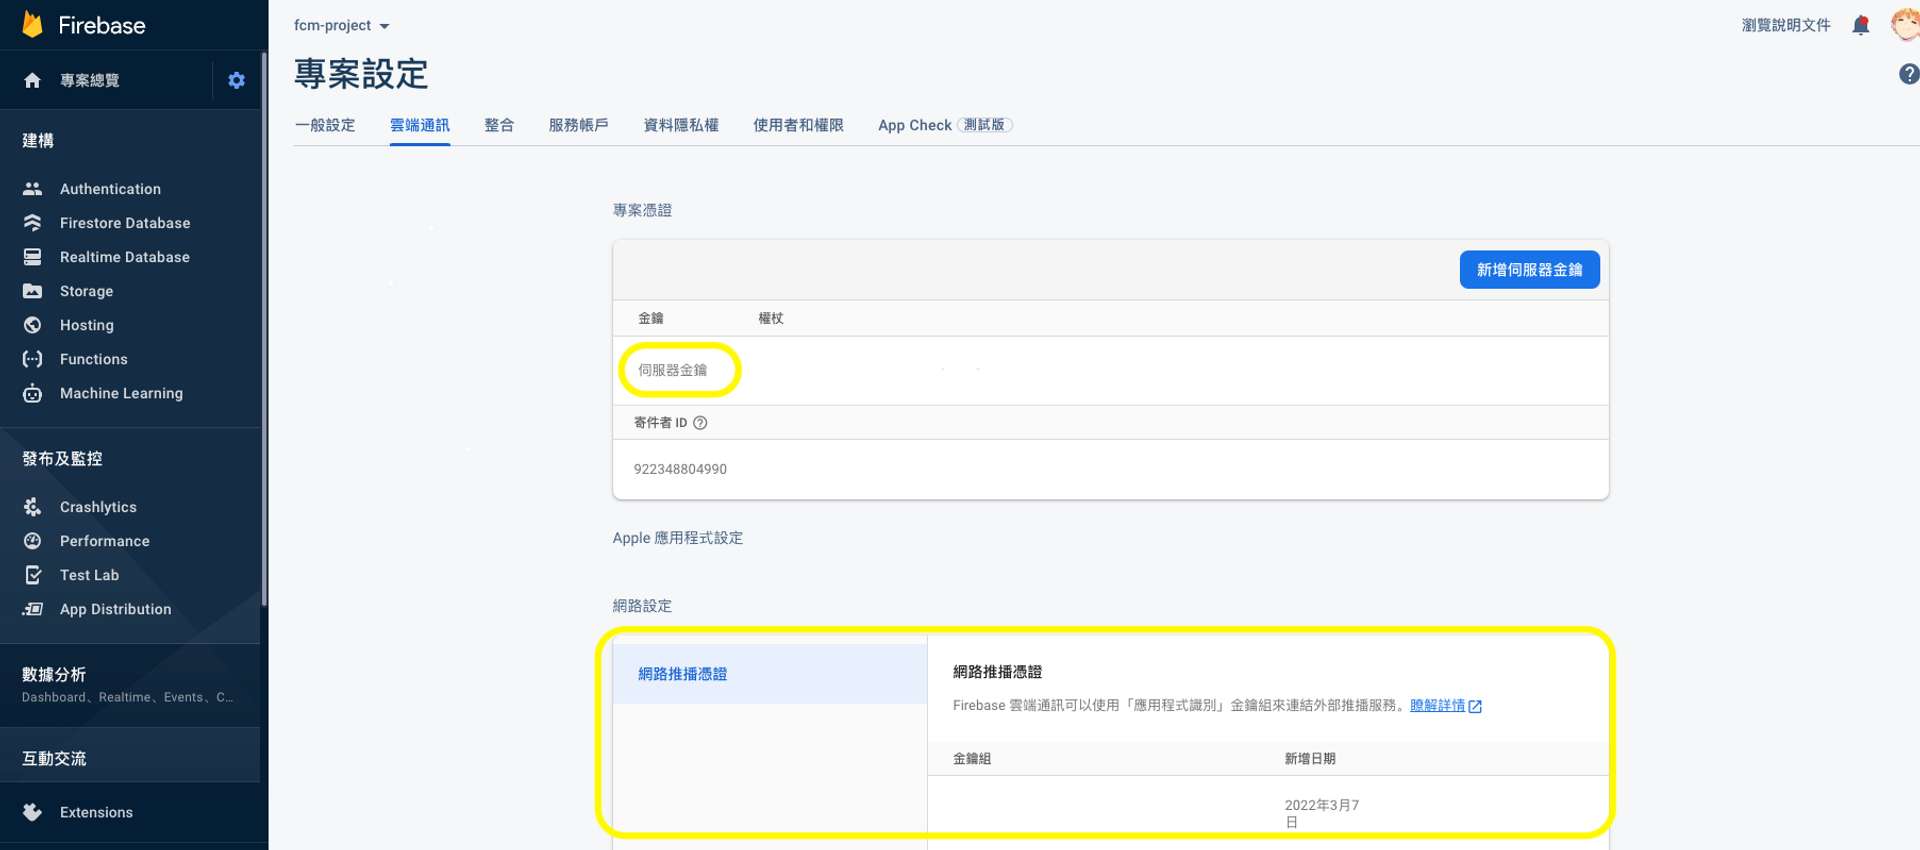
透過金鑰讓我們可以在 firebase 上傳送測試訊息。
在使用者啟用通知設定的情境下,可以透過 firebase 提供的 getToken 方法取得 token。
import { getMessaging, getToken } from "firebase/messaging";

const messaging = getMessaging();
getToken(messaging, { vapidKey: '<VAPID_KEY>' }).then((currentToken) => {
  if (currentToken) {
    // Send the token to server
  } else {
    console.log('No registration token available. Request permission to generate one.');
  }
}).catch((err) => {
  console.log('An error occurred while retrieving token. ', err);
});
取得 token 後就可以使用 firebase 提供的 onMessage 以及 onBackgroundMessage 方法收取與產生通知給使用者。
import { getMessaging, onMessage } from "firebase/messaging";

const messaging = getMessaging();
onMessage(messaging, (payload) => {
  console.log('Message received. ', payload);
});
import { getMessaging, onBackgroundMessage } from "firebase/messaging";
const messaging = getMessaging();
onBackgroundMessage(messaging, (payload) => {
console.log('[firebase-messaging-sw.js] Received background message ', payload);
// Customize notification here
const notificationTitle = 'Background Message Title';
const notificationOptions = {
body: 'Background Message body.',
icon: '/firebase-logo.png'
};
self.registration.showNotification(notificationTitle,
notificationOptions);
});
這邊在 vite config.json 搭配 vite plugin pwa 來 build service worker。vite plugin pwa 背後是透過 Workbox 實作 build service worker,詳細資訊可以到 vite plugin pwa 官方文件 觀看。
import { defineConfig } from 'vite'
import vue from '@vitejs/plugin-vue'
import { resolve } from 'path'
import { VitePWA } from "vite-plugin-pwa";

const pwaOptions = {
  // mode: "development",
  base: "/",
  includeAssets: ["/favicon.png"],
  manifest: {
    name: "notification",
    short_name: "notification",
    description: "Get notifications",
    theme_color: "#ced4da",
  },
  srcDir: "src/service",
  strategies: "injectManifest",
  filename: "firebase-messaging-sw.js",
};


export default defineConfig({
  plugins: [vue(), VitePWA(pwaOptions)],
  resolve: {
    alias: {
      "@": resolve(__dirname, "src"),
    },
  },
  server: {
    open: true,
  },
});
# 小結
閱讀文獻的過程中花了許多時間在理解 pwa 以及 service worker,整體來說蠻有趣的!
在閱讀文章時如果有遇到什麼問題,或是有什麼建議,都歡迎留言告訴我,謝謝。😃
完整程式碼可以透過這個 Github | Repository: vue-fcm 觀看。
# 參考資料
- Document | architectures for your PWA
- Document | serviceWorker
- Document | web Workers API
- Document | push Notifications
- Document | firebase Cloud Messaging
- Document | safari 15.4 Beta Release Notes
- Document | how to make PWAs re-engageable using Notifications and Push
- Blog | sending VAPID identified WebPush Notifications via Mozilla’s Push Service
關於作者
喜歡有趣的設計